Manage shell access from WHM
Many of them knows SSH as remote server accessor. Simply, SSH is abbreviated as shell access commonly. Once if the shell access is enabled, you can connect the server remotely in one command line. This is meant only for creation period since if the users want to enable the shell access immediately. You might get a question what happens if the shell access is disabled in default. No more chaos my friends! We have wise choice to use WHM for enabling the shell access. Along with the shell access you can use secure copy command such as SCP only in terms after enabling the SSH.
In shell access, there are three types of shell access such as Jailed shell, Normal shell and finally disabled shell.
Jailed shell: Jailed shell runs with command line, but it has certain limitations. If the command line found to be harmful by next second, it doesn’t execute the command.
Normal shell: With the help of command line, normal shell gives you entire spot of access. Obviously, limitations are not sustained in normal shell.
Disabled shell: It has the main priority to deny the access while using cPanel.
In this article, let us see how to disable and enable the shell access:
Step 1: Kindly login to WHM with correct login details
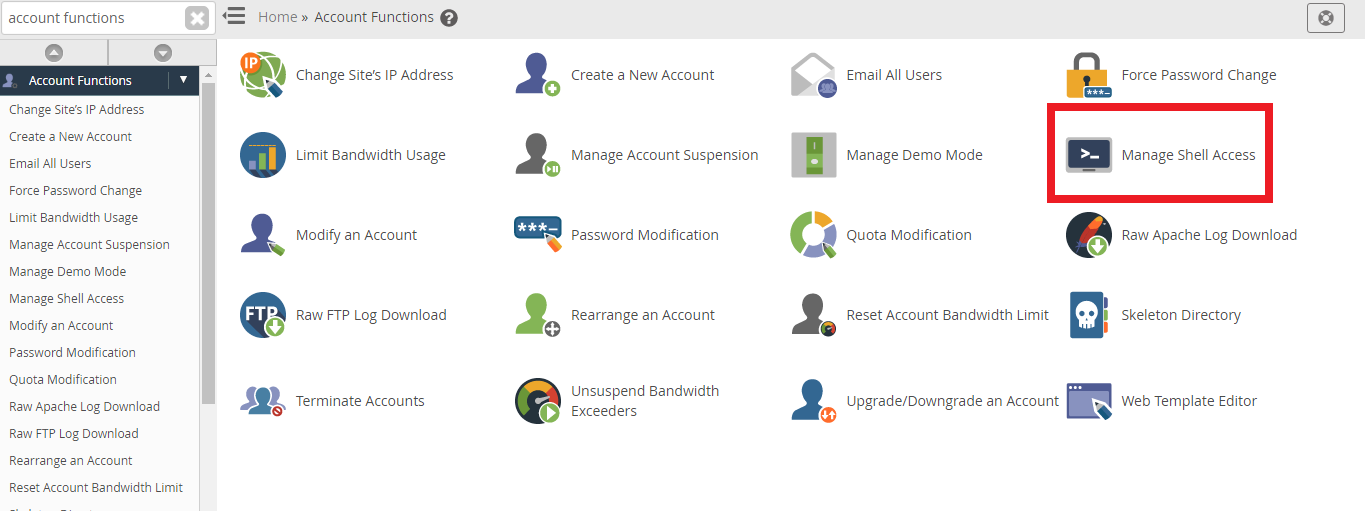
Step 2: Search for the menu Account functions and it opens in new window. There you can see multiple options and choose manage shell access from there.
Step 3: In this step, you will be in right position to disable or enable the shell access. Here, you can see multiple accounts created by you and many user lists. Select the account or user for whom you want to enable or disable the shell access.
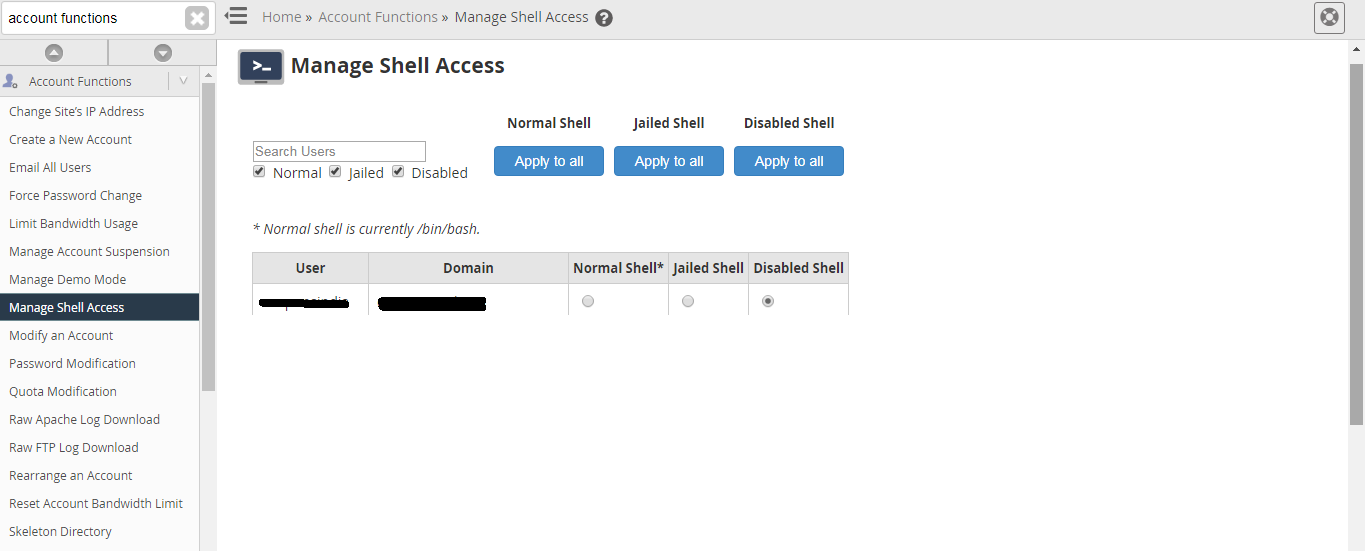
Select what type of shells you want to give access too.
Again, here is another tip to enable or disable shell access using modify account:
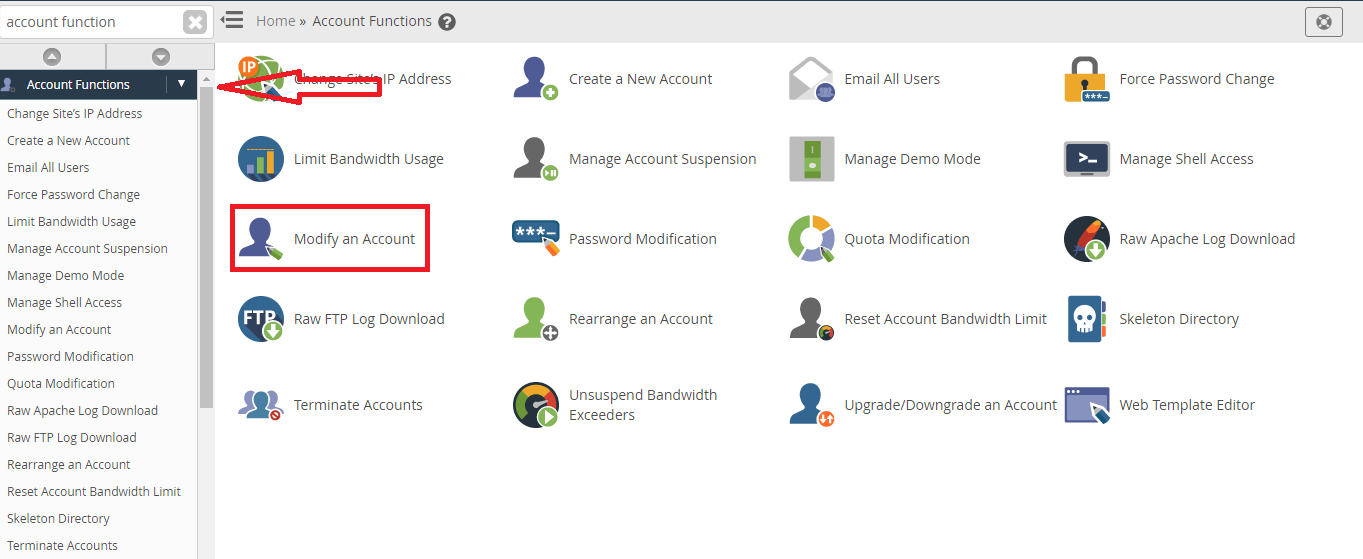
Step 1: In the WHM main page, select the Account function menu and then click on modify account.
Step 2: In modify account page, you can see the list of accounts in cPanel. Choose to which user you want to modify the account and then tap on modify.

Step 3: After clicking on the modify, you will get a screen displaying with few details such as privileges, limitations and further details
Below permission part, there is a save button. Just tap on it to save entire process.
Finally, we have completed enabling or disabling shell access for all users or selected users.
Many of them knows SSH as remote server accessor. Simply, SSH is abbreviated as shell access commonly. Once if the shell access is enabled, you can connect the server remotely in one command line. This is meant only for creation period since if the users want to enable the shell access immediately. You might get a question what happens if the shell access is disabled in default. No more chaos my friends! We have wise choice to use WHM for enabling the shell access. Along with the shell access you can use secure copy command such as SCP only in terms after enabling the SSH.
In shell access, there are three types of shell access such as Jailed shell, Normal shell and finally disabled shell.
Jailed shell: Jailed shell runs with command line, but it has certain limitations. If the command line found to be harmful by next second, it doesn’t execute the command.
Normal shell: With the help of command line, normal shell gives you entire spot of access. Obviously, limitations are not sustained in normal shell.
Disabled shell: It has the main priority to deny the access while using cPanel.
In this article, let us see how to disable and enable the shell access:
Step 1: Kindly login to WHM with correct login details
Step 2: Search for the menu Account functions and it opens in new window. There you can see multiple options and choose manage shell access from there.
Step 3: In this step, you will be in right position to disable or enable the shell access. Here, you can see multiple accounts created by you and many user lists. Select the account or user for whom you want to enable or disable the shell access.
Select what type of shells you want to give access too.
Again, here is another tip to enable or disable shell access using modify account:
Step 1: In the WHM main page, select the Account function menu and then click on modify account.
Step 2: In modify account page, you can see the list of accounts in cPanel. Choose to which user you want to modify the account and then tap on modify.
Step 3: After clicking on the modify, you will get a screen displaying with few details such as privileges, limitations and further details
Below permission part, there is a save button. Just tap on it to save entire process.
Finally, we have completed enabling or disabling shell access for all users or selected users.