There are certain benefits to having custom nameservers. One of them is you’d be able to allow your users to rename their servers that’d help them remember it easily. Marketing professionals and companies and also use custom name for branding. Along with that, it conceals the fact that the hosting is done on a public server, thereby not making the website or apps a prime target for hackers. In you use Plesk and Windows Hosting and want to configure custom nameservers, this article is for you. Learn how to do it step-by-step.
Step-by-Step Process for Configuring Custom Nameservers
Here are the steps to follow:

If you want to add a new Nameserver, you’d have to add a NS Record and a Record.
First, here are the steps to follow for adding NS Record:
In the Host list, the server where you made the changes will be highlighted. That’s because it has not been updated yet. Click on Update to apply the changes you’ve made.
Now, it’s time to add a Record. Here are the steps to follow:
Step-by-Step Process for Configuring Custom Nameservers
Here are the steps to follow:
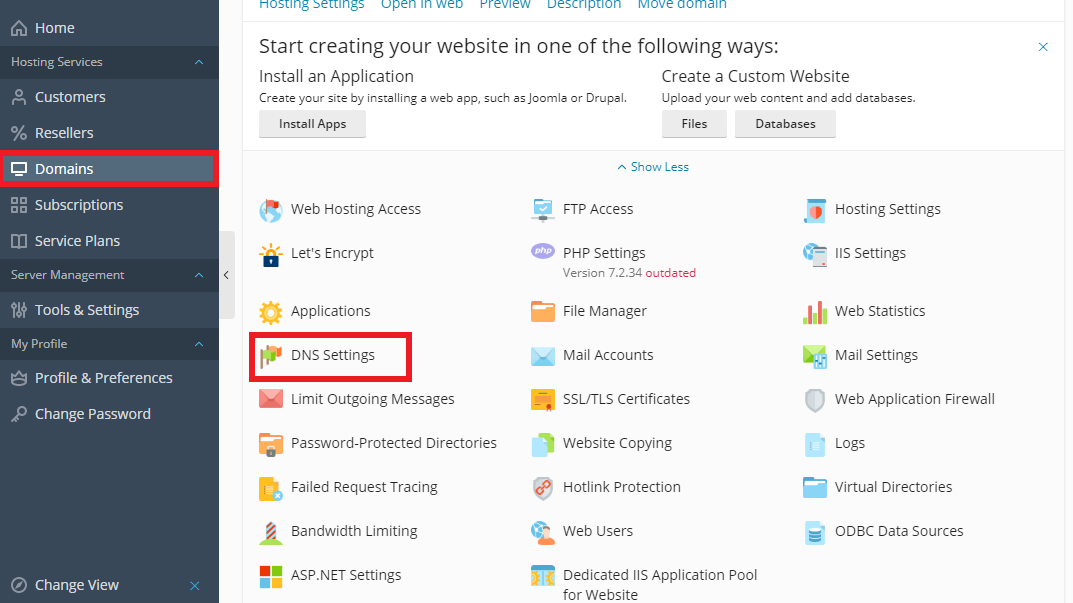
- Log in to your Plesk account
- Open Hosting Services and then click on “Domains” that’s located right under it
- Under the label Domain Names, click on the link
- Then tap on DNS Settings.
- From the Host tab, find and click on the domain name that you wish to customize
- Look for dialog box that reads Edit the Resource Record
- In the Name Server text box, you’d have to provide the Custom name you want to set
- To confirm and apply the changes, click on Apply and then OK
If you want to add a new Nameserver, you’d have to add a NS Record and a Record.
First, here are the steps to follow for adding NS Record:
- Go to Domains and click on Add Record
- For Record Type, select NS
- Provide the name of the domain for Domain name
- Then, provide the custom Name server
- Click on OK to continue
In the Host list, the server where you made the changes will be highlighted. That’s because it has not been updated yet. Click on Update to apply the changes you’ve made.
Now, it’s time to add a Record. Here are the steps to follow:
- Click on Add Record under Domains
- For Record Type, select A
- Provide a name for the Domain name box
- Check if the IP address is correct or leave it as it is
- Click on OK to confirm the changes
- Click on Update.