You are no need to go for indirect ways since you can deal with the command-line interface or Plesk interface in direct ways. Before starting the article, it is a must for you to know all the limitations first:
Step 1: Now, give a direct way to Tools & Settings and then choose the option “Backup Manager”.
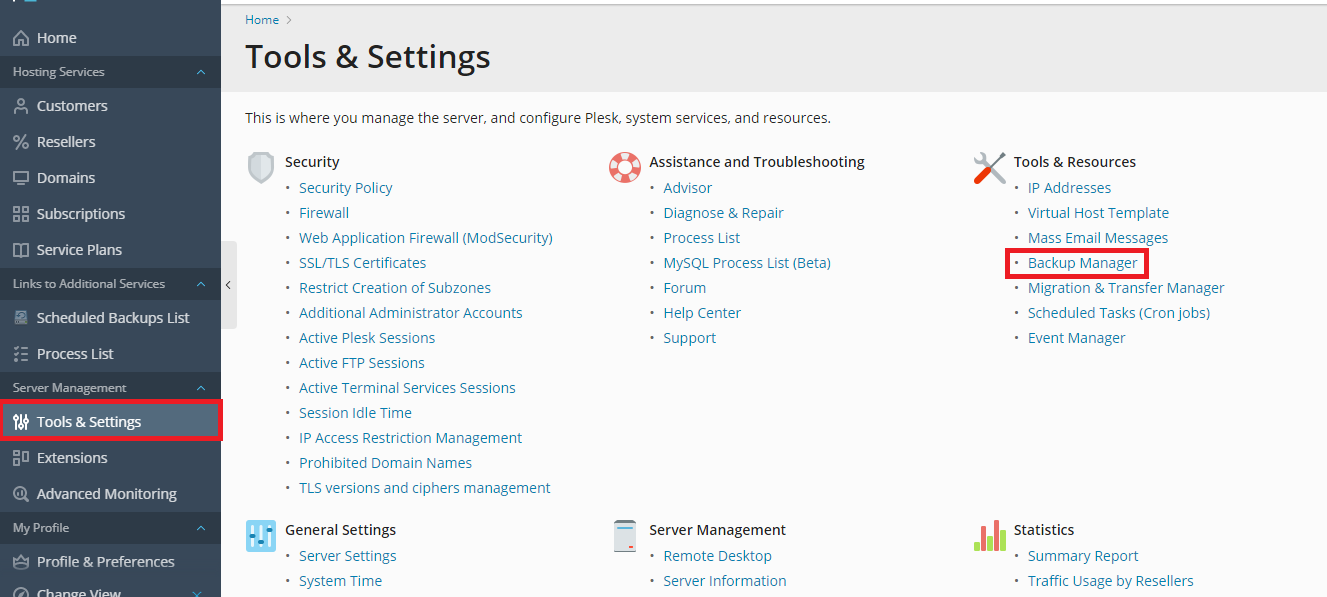
Step 2: It shows you more options like backup, upload, removes, schedule, settings, remote storage settings. Choose the option “Upload” and so, it shows you an explanation of backup security settings.

Step 3: Read it for your reference and below you can see the tick option for “Upload backup files without a valid signature”
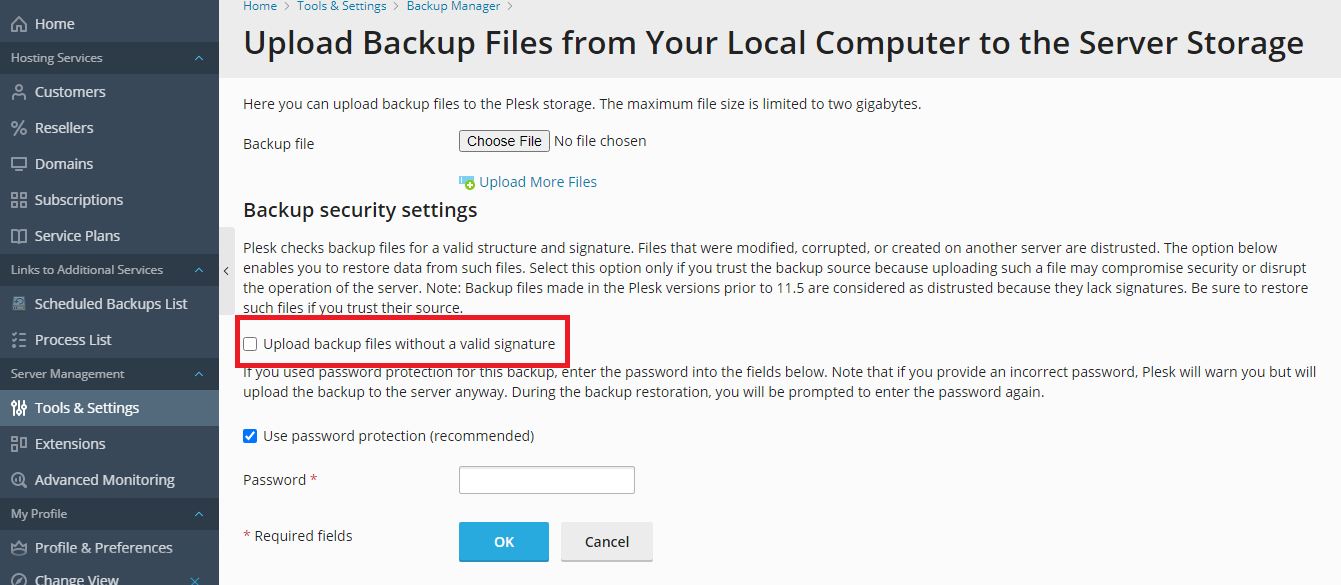
Tick the information without fail and then tap on the button “Browse” present above the explanation of backup security settings.
Step 4: Once if the backup is completely uploaded in backup manager then tap on the backup uploaded recently.
Step 5: Now choose the selection based on the objects or storing the full backup file.
Step 6: Finally, click on the button “Restore”.
Let us try by uploading it with the command line interface:
Step 1: Use SSH for connecting the Plesk server (backup restoration)
Step 2: Just do the transfer of backup exported and don’t forget to restore.
If you are a Linux user try be executing the below commands:
Server – Server-wide backups are restored in server level
Backup_password – Password is for authentication purpose for example if the backup uploads or downloads in the Plesk server the verification is just right. It checks the password mentioned is correct or not!
If you are a Windows user, then execute the below command:
The same specifications are followed here like Linux.
It’s a very simple step it would help you at the core!
- Where you cannot restore a backup file of Plesk xml.tar/xml.zip? You can't store it in Windows Server Plesk.
- Where you cannot restore a backup file of Plesk xml.zip? You can't store it in Linux Plesk.
- How about the version of Plesk while restoring backup files? You can maintain the new or same for versions when backing up the files in a server that is restored.
- What about the license edition? You can work on a higher or the same level of Plesk license edition.
- Do you have limitations in backing up files? Yes! You are limited to upload only 2GB size maximum. If you still want to upload more then try by using the command line interface for uploading more than 2 GB.
Step 1: Now, give a direct way to Tools & Settings and then choose the option “Backup Manager”.
Step 2: It shows you more options like backup, upload, removes, schedule, settings, remote storage settings. Choose the option “Upload” and so, it shows you an explanation of backup security settings.
Step 3: Read it for your reference and below you can see the tick option for “Upload backup files without a valid signature”
Tick the information without fail and then tap on the button “Browse” present above the explanation of backup security settings.
Step 4: Once if the backup is completely uploaded in backup manager then tap on the backup uploaded recently.
Step 5: Now choose the selection based on the objects or storing the full backup file.
Step 6: Finally, click on the button “Restore”.
Let us try by uploading it with the command line interface:
Step 1: Use SSH for connecting the Plesk server (backup restoration)
Step 2: Just do the transfer of backup exported and don’t forget to restore.
If you are a Linux user try be executing the below commands:
Code:
# PLESK_BACKUP_PASSWORD="backup_password" plesk bin pleskrestore --restore /root/backup_info_1712180545.xml.tar -level server -ignore-sign
Code:
/root/backup_info_1712180545.xml.tar – Backup follows this path for restoration.Backup_password – Password is for authentication purpose for example if the backup uploads or downloads in the Plesk server the verification is just right. It checks the password mentioned is correct or not!
If you are a Windows user, then execute the below command:
Code:
C:\>plesk bin pleskrestore.exe --restore "C:\backup_info_1712180545.xml.zip" -ignore-sign -level server -backup-password "backup_password"It’s a very simple step it would help you at the core!