There are some instances where you would delete the file unconsciously. What is the immediate solution for getting back the deleted files? If the deleted file is newly written or newly downloaded, you won’t have the backups. So, it might be a very difficult task to retrieve those files if you use Linux as the operating system. In this article, we are going to learn how to get deleted files from Linux.
The regret sense starts at the terminal window so; try by using the command rm command. Wildcard takes the responsibility of error occurrence as it tries to wipe out more than your expectation. The Linux has the flow of taking the file data with the extension ext4 uses inodes and those tables of inodes look after each inode constantly. Inode’s metadata contains information like permission, owner of the file, and file name. It fetches more info about the point of entry to hard links which redirects to the file without interruption. So, there must a hard link which holds for each file and whenever you create a hard link it counts increases simultaneously. At the same time, if you delete the hard link then the count will automatically reduce.
Here, the inode is considered as unused when you delete the file. But, the main problem exists here – Yes! If you delete the file then the inode won’t be used in this current situation but later you can reuse it. Its reflections show the removal of the hard link present at last. When you open the directory listing, you cannot see the file there. Most probably, all our files will be stored on the hard disk which gives a basic retrieve option for getting deleted files. Cope up all the inodes in one patch with exact data to identify the deleted files. Your file shouldn’t be overwritten or intact from the hard disk. You will also delay with some missing bits where you have an option to create a new inode by copying the old inode details.
Use testdisk for getting your deleted files in one short time. The moment when you delete a file is the worst of all. Do you know why? You must ready to work with all utilities although; if the file is created newly then it won’t be filled in backups. We recommend testdisk at this type of situation where it helps for the people who don’t have enough knowledge on system, easy for installation & use and it won’t ask more information in detail.
How to install testdisk?
When coming to Ubuntu, the below-mentioned command will help you to install.
sudo apt-get install testdisk

If you are a Fedora user, try the below-mentioned command:
sudo dnf install testdisk

If you are a Manjaro user try out the below-mentioned command:
sudo pacman -Sy testdisk

The testdisk has an interface such as rudimentary but it runs in a terminal window as default. You can only use keys like enter and navigation to select. Create a directory for restoring all the files continuously.
How to create a directory? Just type the below command with the directory name “restored”.
mkdir restored

If you are using a directory from starting there is an option to switch from one to one directory. Also, it is a must to start the process of testdisk from the newly-created directory.
cd restored/

Don’t forget to use sudo along with the testdisk as it is the main priority.
sudo testdisk

The Login is the first activity in testdisk because; it raises a question here to login. From the previously created log file, you can create a new one. It is all your choice to create a log file in your way but at the same time, it should not affect the operation of testdisk.

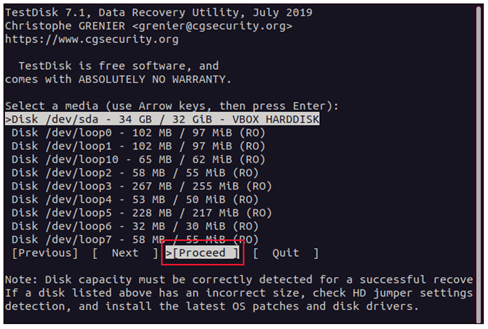
It has given options such as create, append, and no log. Just tap on the enter button to create or append or selecting no log. From the starting point of testdisk, you can create a directory. After selecting the terms, the testdisk asks you to point out the hard disk for choosing the file which got deleted mistakenly. Within a minute, it starts listing the hard disk one by one along with the file squashfs “/dev/loop”. You have the option only to read so, no more corrections here. You don’t have permission to delete or add the files here.
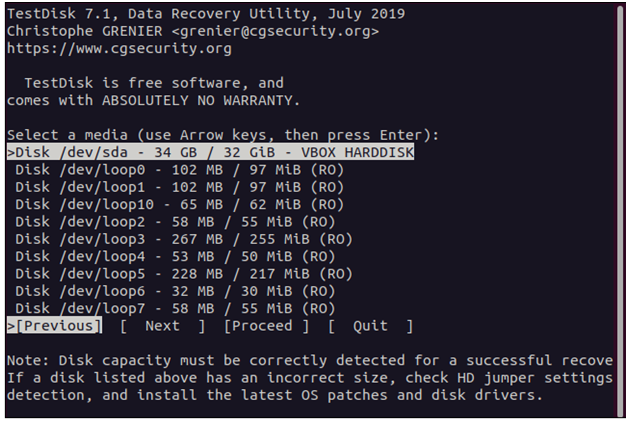
Here, we can see the hard disk so use the down arrow key for highlighting the option “/dev/sda”. Tap on the button proceed and enter once if you highlighted the hard disk.
You must also specify the type of partition ruling over here because testdisk again asks the question. It starts auto-detecting the partition type one by one.
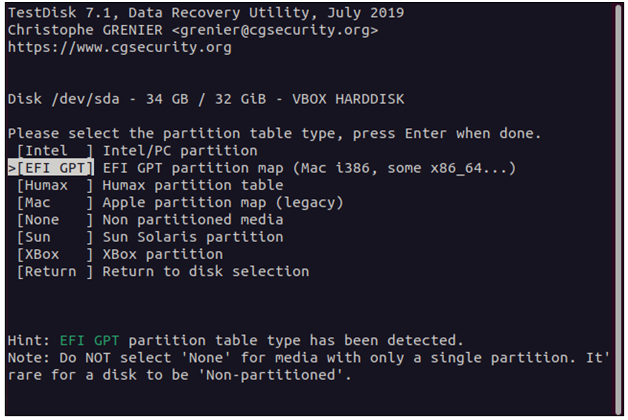
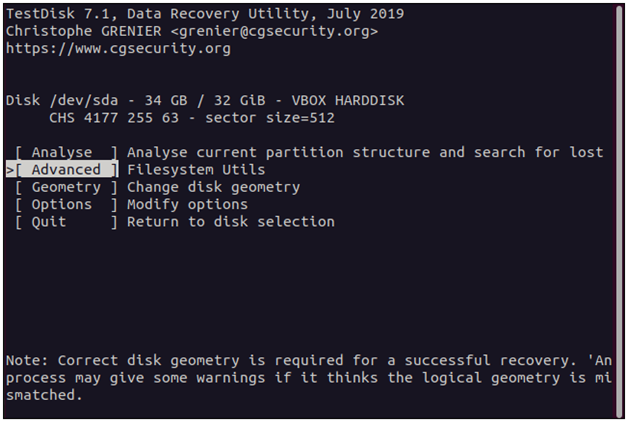
If you haven’t selected the type of partition as said it goes for auto-detect. So, just tap on the options enter. Go to the function menu and select the advanced option. Don’t forget to tap the button “Enter”.
Here, it appears with the partition menu as below-mentioned:
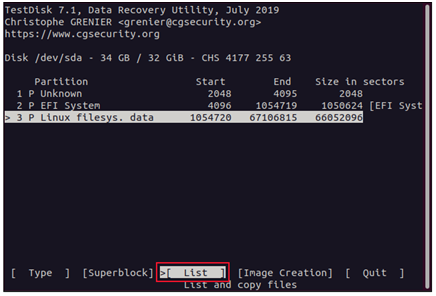
It starts searching for the file system of Linux partitions. You can have one or more in the Linux file system so, choose the file partition by using the arrow keys left and right. Again, go to list and tap the button “Enter”.

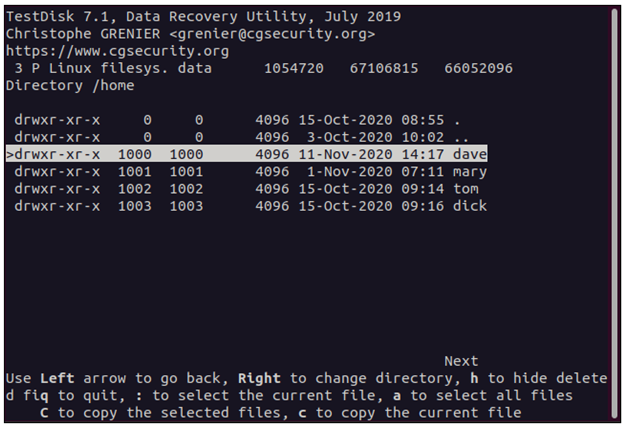
To shift for directories and file lists, use arrow keys down & up or Pgdown and PgUp. To start entering the directory use the right arrow key and for getting out from the directory use the left arrow key. Here, we are searching for the file dave so, do a search on the home directory first. Select a home directory and tap on the entering button.
Secondly, select dave and then tap on “Enter” or the right arrow key.
Go for the account “dave” now check the red highlighted ones because; those files are deleted from the directory. We are still in a search to find the deleted files so don’t leave the directories and files to identify the deleted files.
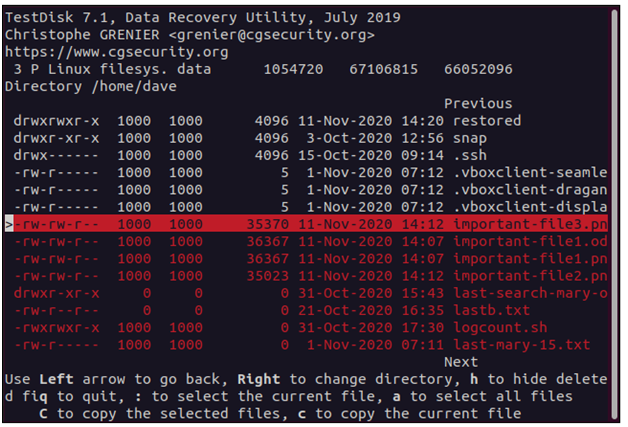
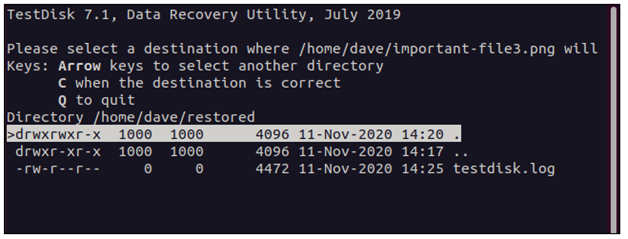
If you find the deleted files, highlight them and tap on the lowercase button “c”. The file display will be automatically changed and it asks for the location to save the deleted files. At the start, we created the directory namely “restored”. Run the testdisk from the restored directory by entering (.) the first entry. Now tap on the uppercase button “C” to get back deleted files.
Do the same process for getting more and more deleted files from the display of file-selection. Use keys uppercase “C” and lowercase “c” for recovering the deleted files.
By now, you have restored the deleted files.
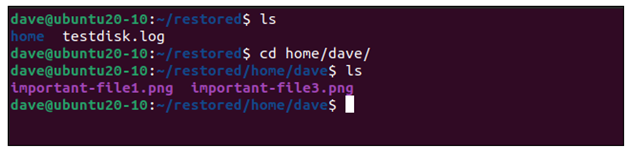
Start reconstructing the directory after you get deleted files. The reconstruction gives a helping hand to you by identifying the hard disk where the deleted files may get located. If two files have the same name in the file system then stores them separately. To check the restored directory, enter the command:
ls
If you give the command to testdisk for starting the log creation then it would be saved in the restored directory. The files which are recovered are saved in the restored directory from “/home/dave,”. Use cd to change the dave directory and don’t use / in front of the home command.
cd home/dave
Check for the file recovered by typing
ls
You can also use –l to get recovered files such as:
ls –l
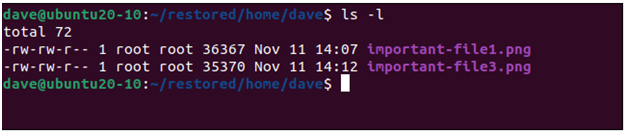
The owner is assembled as “root” as sudo is required for launching testdisk. Later, you can change the owner as root to dave.
sudo chown dave.dave *

Cross-check to analyze the ownership is correct or not:
ls -l
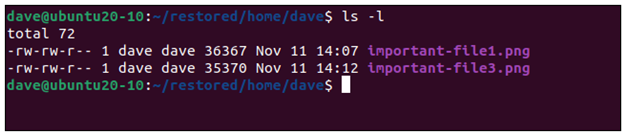
That’s it! We have recovered all the deleted files using the keys C and c.
Dude! It’s a simple command process to get your deleted files even if it is not stored in the backup. You will get an awesome feel after retrieving your deleted files from Linux.
The regret sense starts at the terminal window so; try by using the command rm command. Wildcard takes the responsibility of error occurrence as it tries to wipe out more than your expectation. The Linux has the flow of taking the file data with the extension ext4 uses inodes and those tables of inodes look after each inode constantly. Inode’s metadata contains information like permission, owner of the file, and file name. It fetches more info about the point of entry to hard links which redirects to the file without interruption. So, there must a hard link which holds for each file and whenever you create a hard link it counts increases simultaneously. At the same time, if you delete the hard link then the count will automatically reduce.
Here, the inode is considered as unused when you delete the file. But, the main problem exists here – Yes! If you delete the file then the inode won’t be used in this current situation but later you can reuse it. Its reflections show the removal of the hard link present at last. When you open the directory listing, you cannot see the file there. Most probably, all our files will be stored on the hard disk which gives a basic retrieve option for getting deleted files. Cope up all the inodes in one patch with exact data to identify the deleted files. Your file shouldn’t be overwritten or intact from the hard disk. You will also delay with some missing bits where you have an option to create a new inode by copying the old inode details.
Use testdisk for getting your deleted files in one short time. The moment when you delete a file is the worst of all. Do you know why? You must ready to work with all utilities although; if the file is created newly then it won’t be filled in backups. We recommend testdisk at this type of situation where it helps for the people who don’t have enough knowledge on system, easy for installation & use and it won’t ask more information in detail.
How to install testdisk?
When coming to Ubuntu, the below-mentioned command will help you to install.
sudo apt-get install testdisk
If you are a Fedora user, try the below-mentioned command:
sudo dnf install testdisk
If you are a Manjaro user try out the below-mentioned command:
sudo pacman -Sy testdisk
The testdisk has an interface such as rudimentary but it runs in a terminal window as default. You can only use keys like enter and navigation to select. Create a directory for restoring all the files continuously.
How to create a directory? Just type the below command with the directory name “restored”.
mkdir restored
If you are using a directory from starting there is an option to switch from one to one directory. Also, it is a must to start the process of testdisk from the newly-created directory.
cd restored/
Don’t forget to use sudo along with the testdisk as it is the main priority.
sudo testdisk
The Login is the first activity in testdisk because; it raises a question here to login. From the previously created log file, you can create a new one. It is all your choice to create a log file in your way but at the same time, it should not affect the operation of testdisk.
It has given options such as create, append, and no log. Just tap on the enter button to create or append or selecting no log. From the starting point of testdisk, you can create a directory. After selecting the terms, the testdisk asks you to point out the hard disk for choosing the file which got deleted mistakenly. Within a minute, it starts listing the hard disk one by one along with the file squashfs “/dev/loop”. You have the option only to read so, no more corrections here. You don’t have permission to delete or add the files here.
Here, we can see the hard disk so use the down arrow key for highlighting the option “/dev/sda”. Tap on the button proceed and enter once if you highlighted the hard disk.
You must also specify the type of partition ruling over here because testdisk again asks the question. It starts auto-detecting the partition type one by one.
If you haven’t selected the type of partition as said it goes for auto-detect. So, just tap on the options enter. Go to the function menu and select the advanced option. Don’t forget to tap the button “Enter”.
Here, it appears with the partition menu as below-mentioned:
It starts searching for the file system of Linux partitions. You can have one or more in the Linux file system so, choose the file partition by using the arrow keys left and right. Again, go to list and tap the button “Enter”.
To shift for directories and file lists, use arrow keys down & up or Pgdown and PgUp. To start entering the directory use the right arrow key and for getting out from the directory use the left arrow key. Here, we are searching for the file dave so, do a search on the home directory first. Select a home directory and tap on the entering button.
Secondly, select dave and then tap on “Enter” or the right arrow key.
Go for the account “dave” now check the red highlighted ones because; those files are deleted from the directory. We are still in a search to find the deleted files so don’t leave the directories and files to identify the deleted files.
If you find the deleted files, highlight them and tap on the lowercase button “c”. The file display will be automatically changed and it asks for the location to save the deleted files. At the start, we created the directory namely “restored”. Run the testdisk from the restored directory by entering (.) the first entry. Now tap on the uppercase button “C” to get back deleted files.
Do the same process for getting more and more deleted files from the display of file-selection. Use keys uppercase “C” and lowercase “c” for recovering the deleted files.
By now, you have restored the deleted files.
Start reconstructing the directory after you get deleted files. The reconstruction gives a helping hand to you by identifying the hard disk where the deleted files may get located. If two files have the same name in the file system then stores them separately. To check the restored directory, enter the command:
ls
If you give the command to testdisk for starting the log creation then it would be saved in the restored directory. The files which are recovered are saved in the restored directory from “/home/dave,”. Use cd to change the dave directory and don’t use / in front of the home command.
cd home/dave
Check for the file recovered by typing
ls
You can also use –l to get recovered files such as:
ls –l
The owner is assembled as “root” as sudo is required for launching testdisk. Later, you can change the owner as root to dave.
sudo chown dave.dave *
Cross-check to analyze the ownership is correct or not:
ls -l
That’s it! We have recovered all the deleted files using the keys C and c.
Dude! It’s a simple command process to get your deleted files even if it is not stored in the backup. You will get an awesome feel after retrieving your deleted files from Linux.