DMARC record is gaining popularity among businesses because of the trust factor. DMARC which stands for Domain-based Message Authentication is a protocol that ensures authentic email messaging. If you’re using Cloudflare are your CDN, you can add DMARC for your domain to prevent phishing and scam attacks. Further we will explain it.
How DMARC Works?
A DMARC record is a TXT file that which lives in the dmarc.mydomain.com directory. It is published to the domain’s DNS address and tells a recipient what steps to take if the email fails DMARC authentication.
The DMARC authentication is important because people can send emails under any domain name. If someone sends email from your brand name and it turns out to be a spam email, then it will hurt your brand reputation.
DMARC is made up of two authentication protocols, namely, Sender Policy Framework or SPF and DomainKeys Identified Mail or DKIM. These two determine the authenticity of an incoming email.
To see DMARC in real-life, you need to open the terminal and type <dig txt _dmarc.domainname.net>.
Adding DMARC Record in Cloudflare
Adding DMARC record to your website on Cloudflare CDN is easy. Follow below steps:
- Log in to your Cloudflare account.
- Once you’re in, you’ll be able to see a list of websites. Now choose the particular website for which you need to update DMARC record.
- Then select the DNS option from the top navigation menu
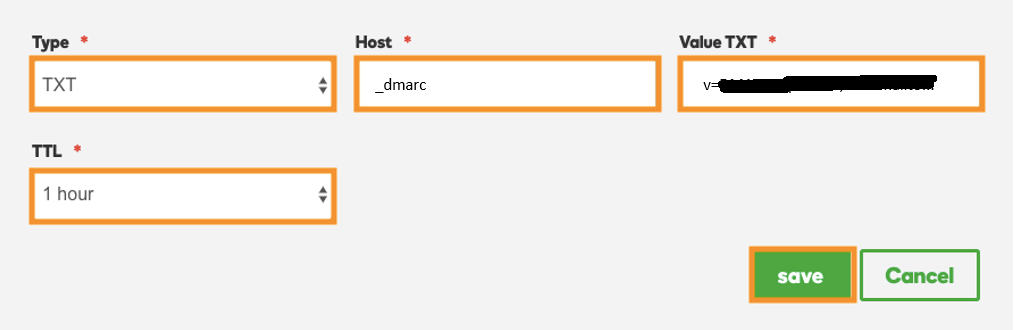
- In the DNS Records section, set the record as TXT and then set the name as “_dmarc.thedomainname.com”
- Next, click on the “Click to Configure” option located next to it
- Paste the DMARC text and click “Save”
- Finally, click on “Add Record” to add the text to the Cloudflare CDN